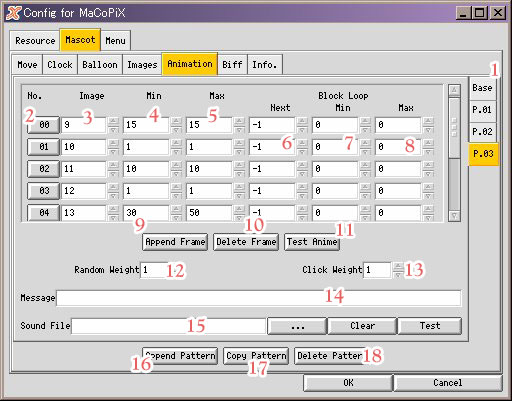
MaCoPiX Configuration
      - Resource Configuration
      - Mascot Configuration
      - Menu Configuration


All of the configuration for MaCoPiX can be changed from the configuration dialog, which one can start from the popup menu.
After you changed your configuration in the dialog, you should click "Ok" button to make your changes effective. But, unless you save your configuration from the popup menu, the new configuration will not save automatically in your files.
The configuration for MaCoPiX will be saved devidedly into these three types of files.
1. Mascot File (*.mcpx)
Configuration for each mascots.
2. Resource File (*.rc)
Configuration for each starting. These should be kept in same in spite of mascot changing.
3. Menu File (*.menu)
Configuration for Lancher Menu
In the configuration dialog, there are three top tags corresponds to the above three files to be saved.


Resource Configulation

    
[Move] [Time Signal] [Biff] [Misc.] [Info.]

Move

In this page, you can change the configuration for moving mode of mascots.

No. Details File
1. (Focus Follow) Starting Point for X-Offset on the Window
You should select the right or left edge of the focused window for the offset starting point.
resource
2. (Focus Follow) the Style of X-Offset on the Window
If the moving mode is "Focus Follow", you can give an X-offset for your mascots in order to avoid the cover up of the switches on the window title bar.
You can select this one between "Absolute" and "Relative".
resource
3. (Focus Follow) the Absolute Pixel Value for X-Offset
If you select "Absolute" in No.2, you should set the offset pixel value in this place. The pixel value should increase towards the left side on the desktop, if you choose the right side as the starting pint in No.1 (This correlation should be reversed in the case of the left side starting point.).
resource
4. (Focus Follow) the Relative Percentage for X-Offset
If you select "Relative" in No.2, you should set the relative percentage for X-offset in this place. This percentage should also increase towards the left side on the desktop, and should be 100 at the left side corner of the focus window, if you choose the right side as the starting pint in No.1 (This correlation should be reversed in the case of the left side starting point.).
resource
5. (Focus Follow) Automatic Scaling of Bar Y-Size
MaCoPiX can automatically scale the thickness of the title bar, which your window manager attaches on each windows. You can select whether you use this automatic scaling or not.
resource
6. (Focus Follow) Title Bar Y-Size for Manual Scaling
If you turned OFF the automatic scaling, you should set the thickness of the title bar (in pixel) manually here.
resource
7. (Focus Follow) Offset for Shaped Bar
Your window manager may attaches a shaped title bar on each windows. In such case, your mascot probably can be seen floating on the title bar. In order to adjust this gap, you can set the offset for the shaped title bar (in pixel, the value increases toward the upper side of the desktop.). This function will work only in the automatic scaling.
resource
8. (Focus Follow) the Mode of Home Position
The mode of home position should be selected from "Never Use" / "No Focus Only" / "Support Sticking Out". If you select one of the latter two modes, the mascot can move to the home position (the exact position should be appointed in the next field.) in the case the desktop has no fucused windows.
Furthermore, if you select "Support Sticking Out", the mascot can move to the home position in the case the mascot sticked out from the upperside of the desktop.
resource
9. (Focus Follow) the Pixel Values for Home Position
You should appoint the starting point of the home position here.
X (from Right to Left on the desktop) & Y (from Bottom to Top on the desktop) are the pixel value from the lower right corner of the desktop. (Please see here for details.).
resource


Time Signal

You can change the configuration for the time signal function in this page.

No. Details File
1. ON/OFF for Time Signal
You can turn ON/OFF the time signal function here. There is a same check button on the popup menu.
---
2. Action in Time Signal
You should appoint the details on the action of time signal in order to use this function. You can choose from "None" / "Click Action" / "Mascot Random Change".
resource
3. External Command for Time Signal
If you want to excute an external command for time signal, you can write down in this place.
This command will be excuted, regardless of your selection in No.10 field.
resource


Biff

You can change the configuration for the biff function in this page. You should start MaCoPiX with "-b" option or check "Biff Check" in the popup menu in order to make the biff function effective, after provide preoper setting in this page

No. Details File
1. Biff Access Protocol
You can choose your access method from "None" / "Local"/ "POP3 (normal)" / "POP3 (APOP auth)".
resource
2. POP3 Port No.
You can appoint the port No. of POP access. The system default No., 110, is inserted as default. So, in usual case, you don't have to touch this one.
resource
3. POP3 Server Address
If you want to use POP3 access, you should describe your mail server address here.
resource
4. POP3 Server UserID
If you want to use POP3 access, you should describe your user ID at mail server here.
resource
5. POP3 Server Password
If you want to use POP3 access, you should describe your password at mail server here.
Please make sure the permission of your resource file (It should be "600" always.), because your password is written in your resource by plain text.
resource
6. Biff Reference File
If you access to local spool, you should describe your mailbox (UNIX mbox style) file here.
resource
7. Biff Update Interval
The minimum is 10sec. And the maximum is 990sec (10sec step).
resource
8. MIME Decode Filter for From/Subject List
If you want to decode base64 encoded texts in mail headers, you should external filter command here. As a default, "nkf -eum" (Nihongo-Kanji-Filter) command may be inserted.
resource
9. Mailer Command
You can appoint your mailer start command here in order to start up your mailer form the mail list window.
This mailer command should be a program running on X Window System. And you need to attach "&" at the end of your command to run it as a background.
resource


Misc.

The configuration miscategorized.

No. Details File
1. Magnification Rate of Mascot
The minimum is 10% - the maximum is 400%.
resource
2. Interpolation Style for Magnification
You can select your style from "Nearest Neighbour" / "Tile" / "Bilenear" / "Hyper". The default is "Bilinear".
resource
3. ON/OFF for Automatic Install
If your selected mascot is not in your user directory, MaCoPiX can install automatically. You can turn ON/OFF this function. But I recommend you to turn ON this function.
resource
4. Clock Default Fontset
If the fontset appointed in the mascot file was not found in your system, this fontset will be used.
resource
5. Balloon Default Fontset
If the fontset appointed in the mascot file was not found in your system, this fontset will be used.
resource
6. Sound Play Command
An ecternal command to play the sound file should be described here, if you want to play any sound files. You can write like "esdplay %s". Here, the part of "%s" will be replace the appointed sound files in each situations.
resource


Info.

The information about the MaCoPiX program itself.

No. Details File
1. Resource File
The current loaded resource file (Full-Path).
---
2. Menu File
The current loaded menu file (Full-Path).
---


Mascot Configulation

    
[Move] [Clock] [Balloon] [Image] [Animation] [Biff] [Info.]

Move

In this page, you can change the configuration for moving mode of mascots.

No. Details File
1. Moving mode
You can choose the moving mode of the mascot from "Fixed Position" / "Focus Follow". "Focus Follow" is the setting for window sitters. Under this setting, MaCoPiX sets its mascot position relative one compared with the right upper corner of the focused window Of course, you can change any offset settings).
mascot
2. Fix Position
The pixel values for "Fixed Position" mode. In your desktop, the mascot will be set its left upper corner on this position. If you chose "Focus Follow", this setting will be ignored.
mascot
3. Mascot Depend Offset for Focus Follow
If the move mode is "Focus Follow", you may want to adjust the position of each mascot as a "window sitter". You can appoint such offset in pixel values.
These values are ignored, if the move mode is "Fixed Position".
mascot


Clock

You can change the configuration for the clock function in this page.

No. Details File
1. Clock Mode
You can choose the clock mode from "No Clock" / "Clock on the Mascot" / "Panel Clock".
mascot
2. Clock Digit Type
Clock Digit Type for the digital clock. AM/PM is now indicated by the position of the dor mark.
mascot
3. Clock Fontset
The fontset for the digital clock. If you click the right side button, the font selection dialog will start.
mascot
4. Panel Position
The relative pixel position of the panel clock (The Start position is the upper left corner of the mascot. X increases from left to right. Y inceases toward the lower side.).
mascot
5. Text Offset for Clock Digit
If you chose "Clock on Mascot" as the clock mode., it will be the relative pixel position from the upper left corner of the mascot. If you chose "Panel Clock", it will be the relative pixel position from the upper left corner of the clock panel.
mascot
6. Border Width of Panel Clock
Pixel value of the border width of the panel clock.
mascot
7. Drop Shadow for the Clock Digit
If you want, you can drop shadow on the clock digit here.
mascot
8. Color Setting
You should select the color for "Text", "Background", "Border", and "Shadow" for the clock. If you click the color button, the color selection dialog will start.
mascot


Balloon

You can change the configuration for the balloon function in this page. But messages in the balloon should be configured in the
Animation field and the Biff field.

No. Details File
1. Balloon Fontset
If you click the right side button, the font selection dialog will start.
mascot
2. Text Offset for Balloon
You can determine the space between frame and text of balloon in pixel value. Each corners of the balloon frame will be cut out by the circle whose radius is this value.
mascot
3. Border Width of Balloon
Pixel value of border width for each balloon frames.
mascot
4. Balloon Default Position
You can select "Right" or "Left" of the mascot for the default balloon position. In the case the balloon frame is sticking out of the desktop, balloon may move to the opposite side automatically.
mascot
5. Color Setting
You should select the color for "Text", "Background",and "Border" for the balloon. If you click each color button, the color selection dialog will start.
mascot


Image

You can appoint the images for the mascot.

No. Details File
1. Image Number Button
You can click these buttons to show registered images on the mascot.
---
2. Image File
You cannot edit here. You should use right buttons to change each files.
Paths for each files do not appear here, because each image files should be seached according to the priority indecated here.
mascot
3. Image Change Button
The file selection dialog will start by these buttons.
---
4. Image Append Button
The file selection dialog for the new image will start by this button.
---
5. Image Delete Button
You cannot delete any images used in the Animation setting. Please take care.
---


Animation

You can change the configuration for the animation of the mascot in this page.

No. Details File
1. Pattern Tag
You may move to each pattern pages with these tags.
---
2. Frame Number Button
You can click these buttons to show registered images for each frames on the mascot.
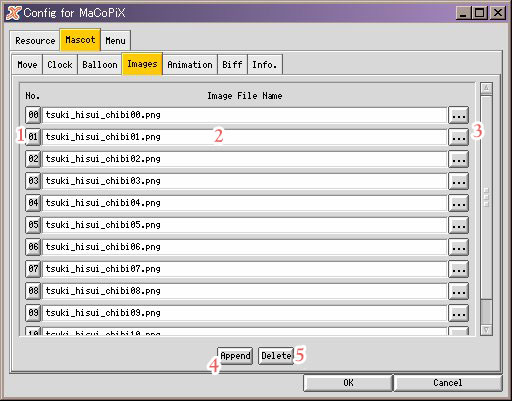
---
3. Image Number
Registered number of images used in each frames. You should appoint the number of the image registered in Images page.
mascot
4. Frame Minimum Time
The unit is 1/10 sec. If this one is different from the next one (maximum), the program will select a random number between two values.
mascot
5. Frame Maximum Time
The unit is 1/10 sec. If this one is different from the previous one (minimum), the program will select a random number between two values.
mascot
6. Block Loop : Destination Frame Number
If you wan to set this frame as the last frame of a block loop, you should appoint the number of the top frame of a loop here.
Except for such case, "-1" should be inserted.
mascot
7. Block Loop : Minimum Loop Number
If you appoint a frame number for the block loop in the previous field, you should determine the minimum number of the loop here. If this one is different from the next one (maximum), the program will select a random number between two values.
mascot
8. Block Loop : Maximum Loop Number
If you appoint a frame number for the block loop in the previous field, you should determine the maximum number of the loop here. If this one is different from the previous one (minimum), the program will select a random number between two values.
mascot
9. Frame Append Button
You can insert any frames in any place with this button.
---
10. Frame Delete Button
This button deletes a frame from the current pattern field. You can delete any frames with this button.
---
11. Animation Test Button
This button shows an animation motion of the current viewing pattern on the mascot.
---
12. Weight for Random Animation
You shold determine this pattern's weight for random animation. If you do't use this pattern in random animation, you should set 0 here.
mascot
13. Weight for Click Animation
You shold determine this pattern's weight for click animation. If you do't use this pattern as click animation, you should set 0 here.
mascot
14. Balloon Messages for Click Animation
You can describe a balloon message which appears in click animation.
Control characters in this message are    %[n]p : Make a new page. Default interval is 1sec.
   %[n]a : Attach new sentence with line feed. Default interval is 1sec.
   %n : Line feed.
   %[n]c : Attach new sentence. Default interval is 1/10sec.
   %% : Print "%".
If you insert an unsigned number in the place of [n], you can change each interval (The unit is 1/10sec).

mascot
15. Sound File for Click Animation
You can register, clear, and test the sound for click animation here. If you want to play any sound files, you have to set external command for sound play here.
mascot
16. Pattern Append Button
This button appends a new pattern at the end of the siries of patterns.
---
17. Pattern Delete Button
You can delete any patterns by this button.
---
18. Pattern Copy Button
This button does not create a new pattern. So please append a pattern at first, if you want a new copied pattern.
---


Biff

You can change the configuration for the biff action of the mascot in this page.

No. Details File
1. Biff Image
MaCoPiX will show this image in the case you have unread mails. If you do not appoint any images here, the default built-in image should be loaded.
mascot
2. Position of Biff Image
You can select right-upper or left-upper side position of the mascot to display the biff image. The default is right.
mascot
3. Offset of Biff Image
You can set offset pixel values of the biff image relative to the position of mascot. Default position (0,0) is the upper left corner of the mascot.
You can change these values by the dragging of the biff image.
mascot
4. Biff Balloon Message
If you have any new arrived mails, this message should appear with the balloon. You can use any character codes listed here.
mascot
5. Biff Sound File
If you have any new arrived mails, MaCoPiX can play this file. Here, you can appoint, clear, and test such sound files. If you want to play this sound file, you have to set external command for sound play here.
mascot


Info.

The information about the current mascot.

No. Details File
1. Mascot Name
The name of the current mascot. The lancher menu uses this.
mascot
2. Mascot File
The file name of the current mascot (Full-Path).
---


Menu Configulation


You can change the configuration for the lancher menu, which are used to change mascots in the popup menu.

No. Details File
1. Category Tag
You may move to each category pages with these tags.
---
2. Category Sequence Change Button
The right arrow button replaces the current category position with the next one. The left arrow button replaces the current category position with the previous one.
---
3. Category Name
You should appoint the name of mascot group. This name will be used in the lancher menu.
menu
4. Mascot Sequence Change Button
The up arrow button on the left side replaces the current mascot position with the previous one. The down arrow button on the right side replaces the current mascot position with the next one.
---
5. Mascot Name
The name of mascots registered in the menu. You cannot edit them here. You should change the name of each mascot here.
---
6. Registered Mascot File
The file of mascots registered in the menu. You cannot edit them here.
menu
7. Mascot Change Button
If you want to change the registered mascot, please click this button. The file selection dialog will start.
---
8. Mascot Append Button
If you want to append a mascot to the menu, please click this button. The file selection dialog will start.
---
9. Mascot Delete Button
If you want to delete a mascot from the menu, please click this button. You can delete any mascots in the menu.
---
10. Category Append Button
If you want to append a new category to the menu, please click this button.
---
11. Category Delete Button
If you want to delete a category from the menu, please click this button. You can delete any categories in the menu.
---
12. Menu Merge Button
If you want to merge a menu to the current one, please click this button.
---

Kurumi Chimari
Last modified: 2007/04/23 18:48:19 HST